
In the digital age, a strong online presence is crucial for business owners, creative professionals, and individuals seeking to share their passions. Wix, a popular website builder, offers a range of design and functionality tools, but there are times when customization or integration is needed beyond its built-in features. HTML, the foundation of the web, allows users to inject custom code into Wix websites, unlocking endless possibilities for design, functionality, and integration. This skill can be used to embed third-party widgets, add interactive elements, or fine-tune the site’s appearance. Let’s explore on how to add html code on Wix.
This blog post guides users through the process of adding HTML code on Wix, including different types of HTML code, where and how to add it, and troubleshooting tips. By the end of this journey, users will be equipped with the knowledge and skills to create a unique and customized Wix website that stands out in the digital world. Whether a seasoned web developer or a beginner, this blog post offers a comprehensive guide to HTML and Wix customization, offering endless possibilities for both experienced and novice users.
Steps on How to Add HTML Code on Wix
how to add HTML code to your Wix website. Over the years, technology has evolved, and we want to show you the latest and most up-to-date method to embed external code on your Wix site. Whether you’re a seasoned Wix user or a newbie, this guide will help you seamlessly integrate HTML code into your website.
Adding HTML Code to Your Wix Website:
Let’s get started! We’ll walk you through the steps of adding HTML code to your Wix website.
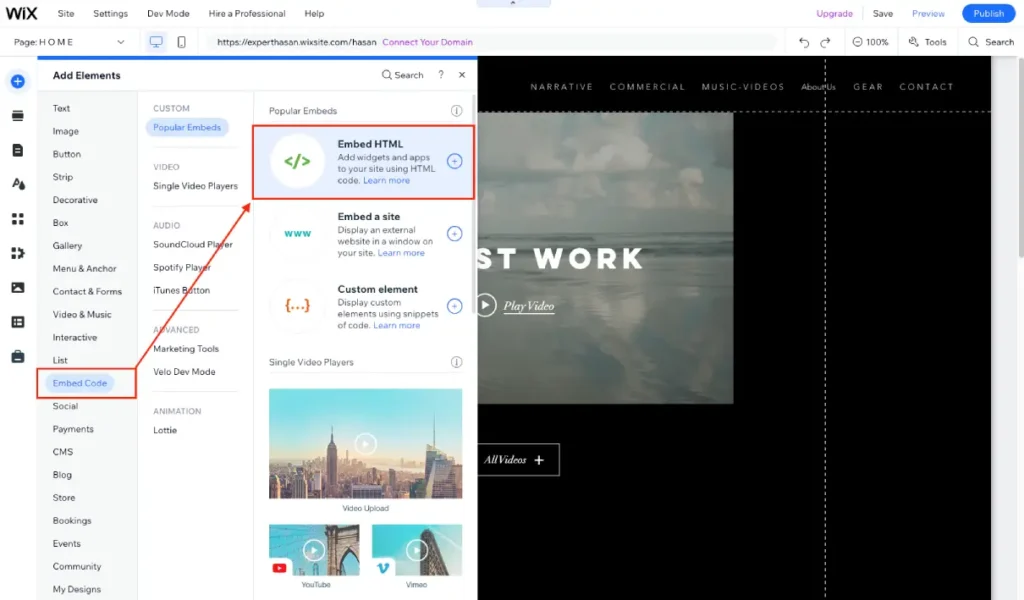
- Access Your Wix Website: Log in to your Wix account and navigate to the website you want to edit. In this example, we’ll use the home page.
- Access the Embed Menu: To add HTML code, click the “Add” button, which is typically located in the top menu bar. This will open a menu with various options.
- Choose “Embed”: Scroll down the menu until you find the “Embed” option. Click on it to reveal additional embedding choices.
- Select “Custom Embed”: In the “Embed” submenu, you’ll see “Custom Embed.” This option allows you to add custom HTML code to your website. Click on it to proceed.
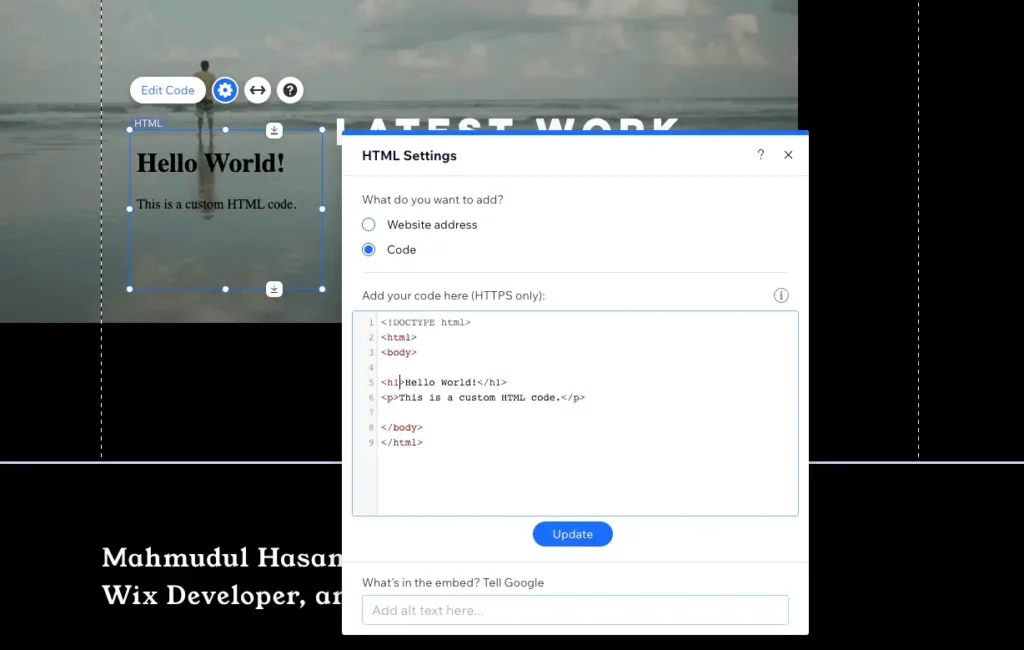
- Enter Your HTML Code: A box will appear where you can enter your HTML code. This is where you’ll paste the code provided by your external service or source. Whether it’s a widget, a site, or a custom element, paste the code into this box.
- Save Your Changes: After pasting your HTML code, click the “Save” or “Apply” button, depending on the Wix version you’re using. Your external content should now be embedded into your website.
Additional Notes:
- Embed a Widget: If you want to embed a widget, such as a calendly calendar, select the “Embed a Widget” option. It will prompt you to enter the code provided by the widget provider. This allows you to integrate third-party widgets seamlessly into your Wix site.
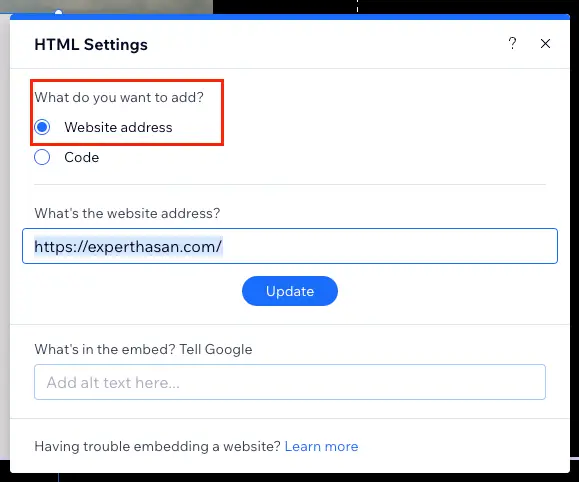
- Embed a Website Address: You can also use the “Embed a Website Address” feature to display external web content directly on your page.
Video Guide on How to Add HTML Code on Wix or Embedded HTML Code
Detailed Guide on How to Add HTML Code on Wix
Let’s explore the detailed guide to add HTML code on your Wix website from different types of HTML code and troubleshooting tips.
Why Add HTML Code on Wix?
A. Enhancing Design and Aesthetics
- Explain how adding HTML code can help you achieve a more unique and tailored design for your Wix website.
- Provide examples of design elements that can be customized with HTML (e.g., fonts, colors, layouts).
- Discuss the limitations of Wix’s built-in design features.
B. Extending Functionality
- Describe how HTML can be used to extend the functionality of your Wix website.
- Highlight specific features that can be added through custom code (e.g., interactive forms, e-commerce integrations, advanced animations).
- Emphasize the flexibility of HTML in enabling complex website functions.
C. Integrating Third-Party Services
- Explain the importance of integrating third-party services or widgets with your Wix website.
- Give examples of services that often require HTML integration (e.g., social media feeds, email marketing tools, analytics scripts).
- Stress the role of HTML in making these integrations possible.
D. SEO and Meta Tags
- Discuss how HTML can be used to optimize your website for search engines (SEO).
- Explain the significance of meta tags, descriptions, and structured data in improving your site’s visibility in search results.
- Mention the limitations of Wix’s SEO features, leading to the need for custom HTML solutions.
E. Responsive Design
- Address the importance of creating a responsive website that adapts to various screen sizes and devices.
- Explain how HTML can be used to fine-tune responsive design elements.
- Provide examples of responsive design challenges that can be solved with HTML.
F. A/B Testing
- Introduce the concept of A/B testing for optimizing website performance.
- Explain how HTML code can be used to implement A/B tests for different elements of your site.
- Highlight the benefits of using HTML for testing and optimizing website content and layout.
G. Custom Tracking and Analytics
- Discuss the significance of tracking user behavior and analyzing website performance.
- Explain how HTML is essential for implementing custom tracking codes, such as Google Analytics or Facebook Pixel.
- Mention the insights gained from custom analytics and how they inform website improvements.
H. Summary
- Summarize the various reasons why adding HTML code on Wix is crucial.
- Emphasize that HTML provides the flexibility and customization needed to create a truly unique, functional, and well-optimized website.
Types of HTML Code for Wix
A. HTML Snippets
- Define HTML snippets and their purpose.
- Explain how HTML snippets are used to embed specific elements or custom content into a Wix page.
- Provide examples of situations where HTML snippets are commonly used (e.g., embedding a YouTube video, adding a custom contact form).
- Offer guidance on creating and inserting HTML snippets into a Wix website.
B. HTML Scripts
- Define HTML scripts and their role in web development.
- Discuss how HTML scripts can be employed to enhance the functionality of a Wix website (e.g., adding interactive elements, custom animations).
- Emphasize the importance of proper script placement within the HTML structure.
- Guide readers on how to add and manage HTML scripts in their Wix site, including any limitations or considerations.
C. HTML Iframes
- Introduce iframes as a way to embed external content within a Wix page.
- Explain the benefits of using iframes for integrating content from external sources (e.g., Google Maps, social media feeds).
- Discuss customization options for iframes, such as adjusting the dimensions or border settings.
- Walk readers through the process of embedding iframes and provide best practices.
D. Summary
- Summarize the three main types of HTML code used in Wix websites: HTML snippets, HTML scripts, and HTML iframes.
- Highlight that understanding when and how to use each type is essential for achieving specific design and functionality goals in a Wix site.
Preparing Your HTML Code
A. Code Validation
- Explain the importance of validating your HTML code.
- Suggest using online HTML validators or integrated tools to check for syntax errors and compliance with web standards.
- Mention that valid HTML code reduces the likelihood of issues and ensures a consistent user experience.
B. Error-Free Code
- Stress the significance of error-free HTML code.
- Discuss common errors to watch out for, such as missing closing tags, incorrect attributes, and broken links.
- Provide tips on how to identify and rectify these errors.
C. Compatibility
- Address the importance of ensuring that your HTML code is compatible with various web browsers.
- Emphasize the need to test your code across different browsers to guarantee a consistent display and functionality.
- Recommend best practices for cross-browser compatibility.
D. Code Comments
- Explain the utility of adding comments within your HTML code.
- Encourage the use of comments to document code, making it more understandable and maintainable.
- Provide examples of when and how to use comments effectively.
E. Backup Your Website
- Advise readers to create backups of their Wix websites before adding custom HTML code.
- Stress the importance of having a recent backup as a safety net in case anything goes wrong during the code integration process.
- Recommend methods for creating backups within the Wix platform.
F. Testing
- Emphasize the necessity of testing your HTML code on a staging or development version of your Wix website.
- Provide guidance on how to set up a testing environment.
- Encourage thorough testing to ensure that the code functions as expected and doesn’t disrupt the site’s existing features.
G. Documentation
- Explain the value of documenting your custom HTML code.
- Suggest creating a reference document that outlines the purpose and placement of the added code.
- Highlight the benefits of documentation for future reference and troubleshooting.
H. Summary
- Summarize the key steps in preparing your HTML code for integration into your Wix website, including validation, error-free code, compatibility testing, creating backups, thorough testing, and documentation.
- Stress that proper preparation is essential to ensure a smooth and trouble-free integration of HTML code into your Wix site.
Adding HTML Code to Wix
A. Step 1: Access the Wix Editor
- Explain how to log in to your Wix account if not already logged in.
- Guide readers on how to access the Wix website editor.
- Provide tips for selecting the specific website you want to edit, if you have multiple sites in your account.
B. Step 2: Choose Where to Add HTML
- Discuss the different areas within your Wix website where you can add HTML code (e.g., pages, header, footer).
- Explain the purpose and common use cases for each location.
- Help readers decide where to place their HTML code based on their specific goals.
C. Step 3: Adding HTML Snippets
- Describe how to add HTML snippets to a page on your Wix website.
- Walk readers through the process of embedding HTML snippets.
- Highlight the importance of accurate placement and customization options.
- Address any potential limitations or issues that may arise when adding HTML snippets.
D. Step 4: Adding HTML Scripts
- Explain the process of adding HTML scripts to your Wix site.
- Emphasize the significance of script placement within the HTML structure.
- Discuss how to manage and customize scripts for specific functionality.
- Provide solutions for common challenges, such as script conflicts.
E. Step 5: Adding HTML Iframes
- Guide readers on how to embed external content using iframes on Wix pages.
- Explain the customization options for iframes, including dimensions and borders.
- Offer tips for ensuring a seamless integration when using iframes.
- Address any issues related to iframe embedding.
F. Verification and Testing
- Stress the importance of verifying and testing the added HTML code within the Wix editor.
- Encourage readers to preview their changes and ensure that the code functions as intended.
- Provide guidance on how to trouble
Troubleshooting Common Issues
A. Code Not Displaying or Working
- Address the issue of HTML code not displaying or functioning as expected on the Wix site.
- Explain possible causes, such as incorrect code placement or syntax errors.
- Offer solutions, including checking code placement, ensuring proper syntax, and verifying code compatibility.
B. Layout and Design Problems
- Discuss issues related to layout or design disruption caused by added HTML code.
- Explain how code can affect the website’s appearance, such as misaligned elements or broken styles.
- Provide guidance on resolving these issues, which may involve adjusting the HTML or applying custom CSS.
C. Mobile Responsiveness Issues
- Highlight problems that can arise with mobile responsiveness when using HTML code.
- Explain how added code may not adapt correctly to smaller screens.
- Offer tips on ensuring mobile-friendly design, including responsive CSS or alternative code for mobile views.
D. Slow Page Loading
- Discuss the issue of slow page loading due to heavy or inefficient HTML code.
- Explain how code can impact site performance and load times.
- Provide recommendations for optimizing code, such as minimizing HTTP requests or utilizing content delivery networks (CDNs).
E. Code Conflicts
- Address the possibility of conflicts between the added HTML code and existing Wix features or scripts.
- Explain how code conflicts can lead to unexpected behavior or errors.
- Offer strategies for diagnosing and resolving conflicts, including adjusting script order or using no-conflict mode for JavaScript libraries.
F. Code Security and Vulnerabilities
- Discuss the importance of code security when adding custom HTML.
- Explain potential security vulnerabilities, such as cross-site scripting (XSS).
- Provide recommendations for ensuring code security, such as validating input and using secure connections (HTTPS).
Additional Resources and References
As you continue your journey of enhancing your Wix website with HTML, here are some additional resources and references to further expand your knowledge and explore related topics:
- How to Add a Pop Up on Wix – Step-by-Step Guide
- Learn how to create engaging pop-up elements on your Wix website to capture the attention of your visitors effectively.
- How to Delete a Page on Wix: 3 Simple Steps
- Discover the easy process of removing unwanted pages from your Wix site, keeping your content organized and streamlined.
- How to Add Google Reviews to Wix Website – Easy Steps
- Enhance the credibility and trustworthiness of your website by integrating Google Reviews into your Wix pages.
- How to Change Domain Name on Wix – Step-by-step
- If you’re considering a domain name change, this guide will walk you through the process step-by-step.
- How to Change Wix Template
- Explore the flexibility of Wix by learning how to change your website’s template, allowing for a fresh look and feel.
- How to Get a Picture in a Lightbox Wix
- Dive into the world of lightboxes to showcase images on your Wix site in an elegant and interactive manner.
These additional resources provide valuable insights and step-by-step guides for various aspects of Wix website customization and management. They can help you further refine your website and user experience. Whether you’re looking to implement specific features or optimize different elements of your site, these resources offer practical guidance to assist you on your Wix website journey.
Conclusion: How to Add HTML Code on Wix
In the ever-evolving world of web design and online presence, mastering the art of how to add html code on Wix website is a valuable skill that can transform your digital space. As we conclude this journey through the intricacies of HTML customization on Wix