To boost conversions and engage customers, an attractive and user-friendly website is crucial in the world of e-commerce. One way to enhance the functionality and aesthetics of your Shopify store is by adding icon images to the footer section. These small visual elements can serve several purposes, such as highlighting key information, providing navigation shortcuts, or showcasing your brand’s social media presence. This guide will walk you through the step-by-step process of how to put icon images in footer shopify, making it more visually appealing and functional.
Whether you want to include icons for contact information, payment methods, or social media links, this tutorial will provide you with the knowledge and guidance you need to make your Shopify store more visually appealing and functional. So, let’s get started and transform your Shopify footer into a powerful and engaging element of your online storefront.
Preparing Your Icon Images
Before you add icons to your Shopify footer, ensure they are well-prepared. Follow these steps:
- Image Dimensions: Determine the ideal dimensions for your icon images based on your chosen design and the specific footer section where they will be placed. Common icon sizes are typically between 20×20 pixels to 50×50 pixels. Ensure all your icons have consistent dimensions for a polished look.
- File Format: Use image formats that are widely supported and suitable for web use, such as PNG or SVG. PNG is suitable for most scenarios, while SVGs are scalable and perfect for responsive design.
- Transparency: If your icons have irregular shapes or need to blend seamlessly with the background color of your footer, consider using PNG images with transparent backgrounds. This will help the icons integrate better into your website’s design.
- Optimize for Web: Compress and optimize your icon images to reduce their file size without sacrificing quality. Smaller file sizes contribute to faster page loading times, which is crucial for a positive user experience.
- Consistency: Maintain a consistent style and color scheme for your icon images to ensure they align with your overall brand identity and website design. Consistency helps convey professionalism and reinforces your brand image.
- High-Quality Graphics: Ensure that your icons are high-quality and legible. Avoid using low-resolution images that may appear blurry or pixelated on high-definition screens.
- Accessibility: Keep in mind that some users may have visual impairments. Use meaningful alt text for each icon to make your website more accessible to everyone.
It is important to give careful consideration to preparing your icon images, as this will help you create a more visually appealing and cohesive Shopify footer. This, in turn, enhances the user experience and strengthens your brand identity. Once you have prepared your icon images, you can proceed to add them to your Shopify store’s footer, which we will discuss in the following sections.
Accessing Your Shopify Admin
To add icon images to the footer of your Shopify store, you’ll need to access your Shopify admin dashboard. Follow these steps to log in:
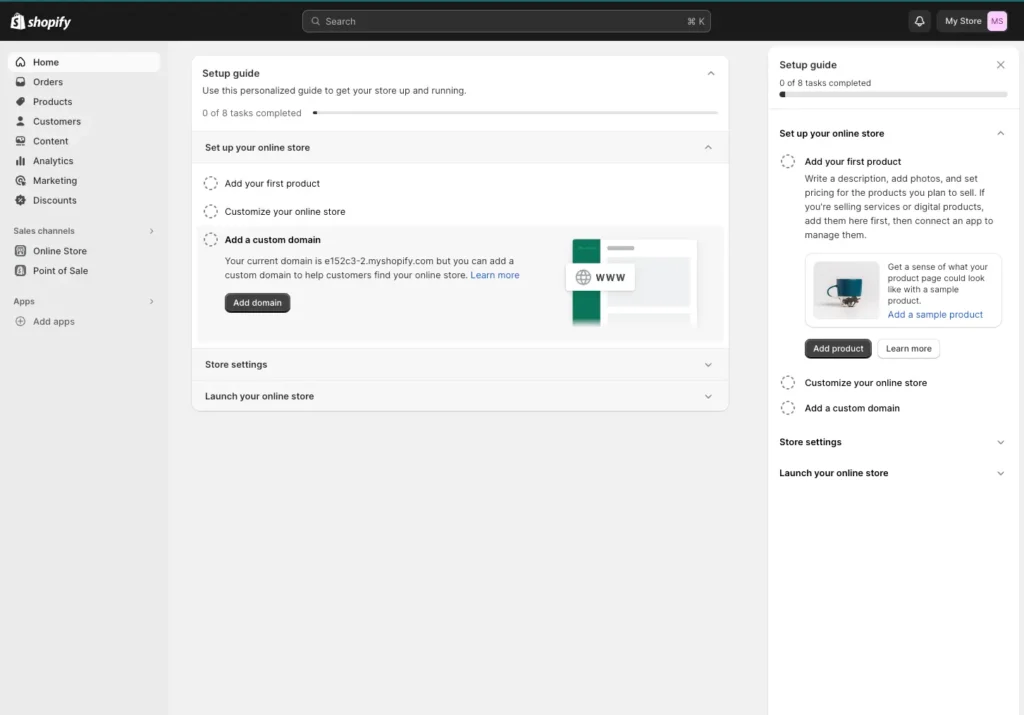
- Open Your Web Browser: Launch your preferred web browser (e.g., Google Chrome, Mozilla Firefox, Safari, etc.).
- Go to Shopify: In the web address bar, type “www.shopify.com” and press “Enter” to access the Shopify website.
- Log In: On the Shopify homepage, click the “Log in” button in the upper right corner.
- Enter Your Credentials: You will be prompted to enter your Shopify store’s login credentials, which typically include your email address and password. Enter these details accurately.
- Log In: Click the “Log in” button to proceed.
- Access Your Dashboard: Once logged in, you will be directed to your Shopify admin dashboard. This is the central hub for managing your online store, where you can control various aspects of your store’s appearance, products, orders, and settings.
After accessing your Shopify admin, you can customize your store’s footer and add icon images based on your design and branding preferences. Although the steps may differ slightly depending on the theme you’ve chosen, the overall process remains consistent. To begin, navigate to the theme customization section and make the desired changes to your footer.
Select the Appropriate Footer Section
Accessing your Shopify admin dashboard is just the first step in adding icon images to your store’s footer. To do so, you’ll need to identify and select the specific footer section where you want to add them. The footer of your Shopify store is divided into various sections, such as footer menus, social media icons, and contact information. Follow these steps to choose and access the appropriate footer section:
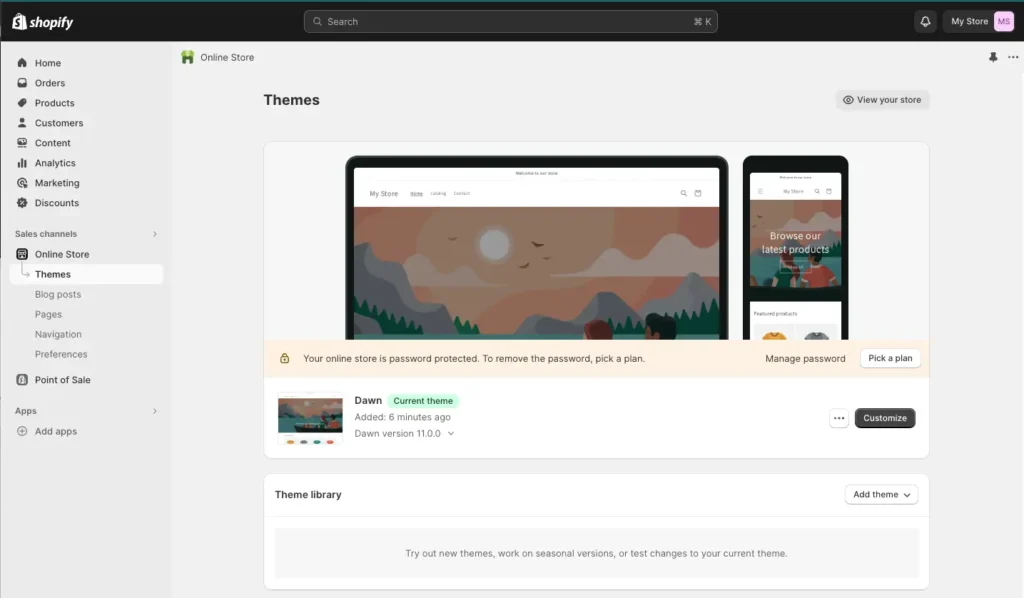
- From your Shopify admin dashboard, navigate to the left-hand menu and click on “Online Store.” This will take you to the main Online Store settings.
- Under the Online Store settings, select “Themes.” This will lead you to the Themes page, where you can customize your store’s theme.
- In the Themes page, you’ll see a list of installed themes for your Shopify store. Find and click on the theme that you want to customize. If you’re not sure which theme you’re using, click the “Customize” button on any theme; you can always cancel without saving changes if it’s not the one you want.
- Once you’re inside the theme customization panel, look for a section labeled “Footer” or “Footer Settings.” The exact wording may vary depending on your theme.
- Within the Footer section, you’ll typically find options to customize different elements of the footer, such as the footer menu, payment icons, social media icons, and contact information.
- Click on the relevant section that corresponds to where you want to add icon images. For example, if you want to add social media icons to the footer, click on the “Social Media” or “Social Icons” section.
- Now you’re inside the customization panel for the selected footer section. Here, you can make changes to the content and appearance of this specific part of your footer.
- Look for an option related to adding images or icons. Depending on your theme, this option might be called “Add Image,” “Upload Icon,” or something similar. Click on this option to proceed with adding your icon images.
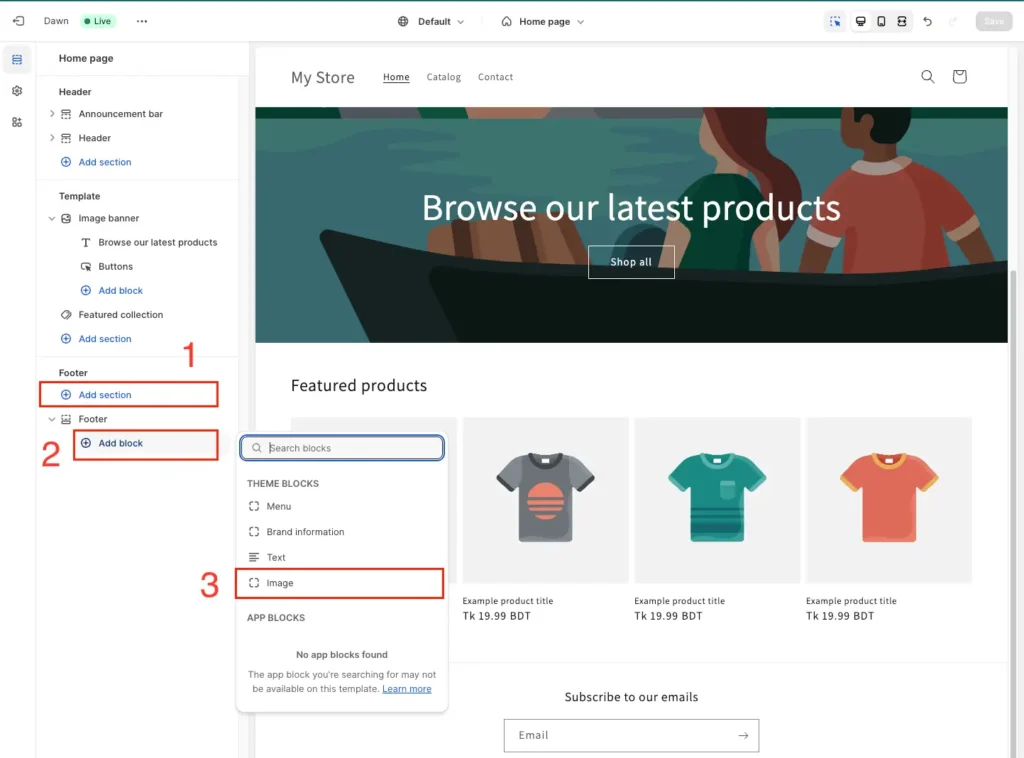
It’s important to note that the availability and labeling of customization options may vary depending on your theme. If you can’t find a specific customization option, check the theme’s documentation or reach out to the developer’s support for help. Once you’ve chosen the footer section you want, you can add your icon images and customize their placement and appearance to your liking.
Adding Icon Images
Once you have accessed the footer section in your Shopify theme customization panel, you can begin adding your icon images. The specific steps may differ based on your theme, but here is a general guide to assist you with adding icon images to your Shopify footer:
- Access the Footer Customization Panel: Make sure you are inside the footer customization panel for the specific section where you want to add icon images (e.g., social media icons, payment icons). If not, navigate to the relevant section as described in the previous step.
- Locate the Image Upload Option: Look for an option that allows you to add images or icons. This option may be labeled as “Add Image,” “Upload Icon,” or something similar. Click on it to open the image upload dialog.
- Upload Your Icon Images: In the image upload dialog, you can either upload the icon images from your computer or select them from your Shopify media library if you’ve already uploaded them. Follow these steps:
- Click the “Upload” or “Select from Library” button.
- If uploading, browse your computer and select the icon image files you prepared earlier.
- If selecting from the library, choose the relevant images from your existing media library.
- Position and Customize the Icons: After uploading or selecting the icon images, you may have options to adjust their placement and appearance. Common customization options include:
- Icon size: Resize the icons to fit the footer section appropriately.
- Spacing: Adjust the spacing or alignment of the icons within the footer.
- Linking: If you want the icons to be clickable, set up links to specific pages or external URLs associated with each icon.
- Preview Your Changes: Before saving your modifications, it’s a good practice to preview how the icon images will appear in the actual footer. Some themes offer a live preview feature that allows you to see changes in real-time.
- Save Your Changes: Once you are satisfied with the placement and appearance of your icon images, be sure to save your changes. Look for a “Save” or “Publish” button in the footer customization panel to apply your modifications.
- Check Your Live Store: After saving your changes, visit your live Shopify store to ensure that the icon images display correctly in the footer section you customized. Verify that they are clickable and functioning as intended.
- Test Responsiveness: Test your store on different devices (e.g., desktop, tablet, mobile) and web browsers to ensure that the icon images adapt to various screen sizes and maintain their appearance and functionality.
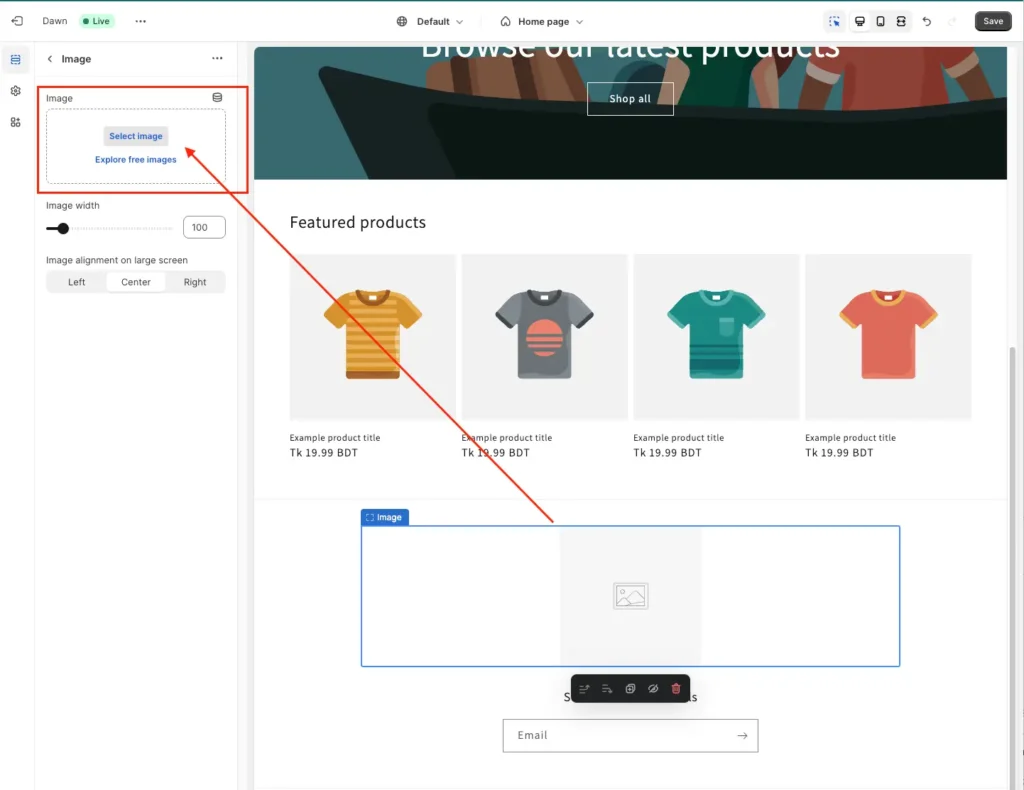
To enhance the visual appeal and functionality of your online store, you can add icon images to your Shopify footer by following these simple steps. In case of any issues or if you require further customization, kindly refer to your theme’s documentation or seek assistance from Shopify support or a developer familiar with your theme.
By Coding: Follow the Video
1-)  Code to add to footer.liquid: ( do not forget to add chevrons (angle brackets) )

img class="payment-iyzico" src="https://cdn.shopify.com/s/files/1/052..."

2-) Code to add to base.css:

/* -- iyzico payment logo -- */
.payment-iyzico {
 width: 40px;
   filter: grayscale(100%);
}
/* -- end -- */
Adjusting Icon Placement
It’s important to properly position and align icon images in your Shopify footer for an organized appearance. Follow these steps to adjust their placement:
- Access the Footer Customization Panel: Make sure you are still within the footer customization panel for the specific section where you added the icon images. If not, navigate to that section as previously explained.
- Select the Icon Images: To adjust the placement of individual icon images, you may need to select them. Depending on your theme and customization options, you might be able to click on an individual icon image to select it.
- Use Drag-and-Drop: Many Shopify themes offer a drag-and-drop functionality for rearranging elements within a section. If your theme supports this feature:
- Click and hold the icon image you want to move.
- Drag it to the desired position within the footer section.
- Release the mouse button to drop the icon in the new location.
- Adjust Margins and Padding: In some cases, you may need to adjust the margins and padding of the icon images to control their spacing and alignment:
- Look for customization options related to margins or padding in the footer section.
- Increase or decrease the values to fine-tune the positioning of the icon images.
- Use Alignment Options: Depending on your theme, you may have alignment options that allow you to align the icon images horizontally or vertically within the footer section. Explore these options to achieve the desired layout.
- Preview Changes: After making adjustments, it’s crucial to preview your changes to see how the icon placement appears in the actual footer. Some themes offer a live preview feature for real-time feedback.
- Save Your Changes: Once you are satisfied with the placement of your icon images, remember to save your modifications. Look for a “Save” or “Publish” button within the footer customization panel.
- Test Responsiveness: As a final step, test the responsiveness of your store on different devices and web browsers to ensure that the icon images maintain their placement and alignment across various screen sizes.
- Double-Check Links (If Applicable): If your icon images are linked to specific pages or external URLs, verify that the links are still functioning correctly after adjusting their placement.
To improve the look and feel of your Shopify store’s footer, it’s essential to adjust the placement and alignment of icon images. This can make your store more visually appealing and enhance the overall user experience. If you face any challenges or require customized solutions, refer to your theme’s documentation or seek support from Shopify or a developer who specializes in your theme.
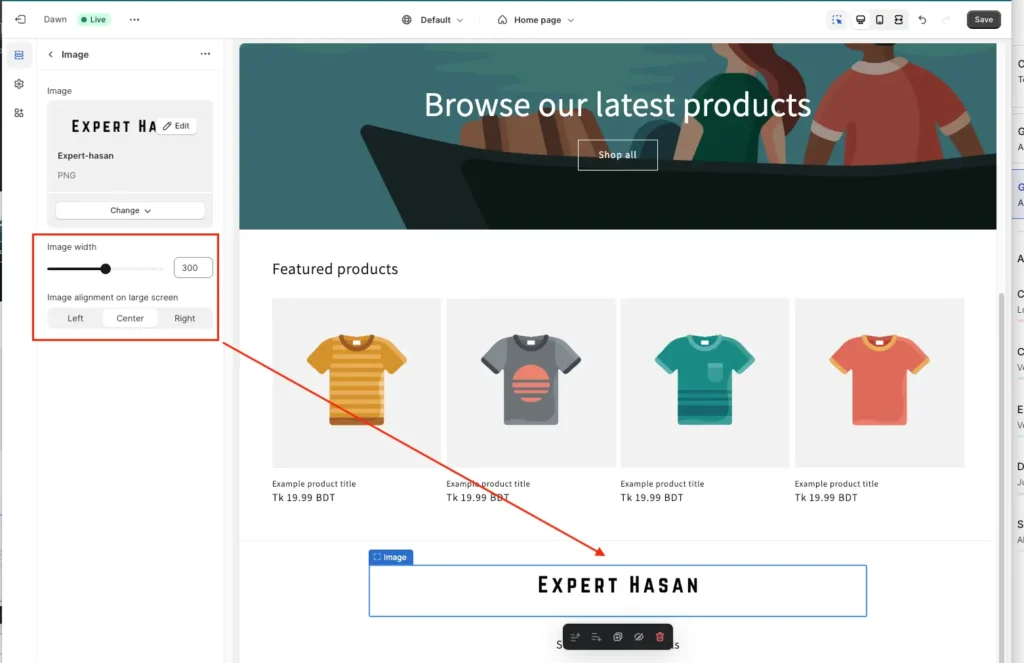
Linking Icon Images (Optional)
To enable users to navigate to specific pages or external websites by clicking on the icons in your Shopify footer, you may add links to the icon images. Here’s a step-by-step guide on how to link the icon images in your footer.
- Access the Footer Customization Panel: Make sure you are still within the footer customization panel for the specific section where your icon images are located.
- Select an Icon Image: To add a link to an icon image, you may need to select the image first. Depending on your theme, you might be able to click on the icon image to select it.
- Locate the Link or URL Option: Look for an option in the footer customization panel that allows you to add a link or URL to the selected icon image. This option could be labeled as “Add Link,” “Link to Page,” or something similar.
- Enter the Destination URL: In the link or URL option, enter the web address (URL) where you want the icon to redirect users when clicked. This can be a page within your Shopify store, an external website, or any other URL.
- Choose Link Behavior (Optional): Depending on your theme and customization options, you might have settings to choose how the link opens. Common options include:
- “Open in the same tab/window”: The link will replace the current webpage.
- “Open in a new tab/window”: The link will open in a new browser tab or window.
- Apply the Link: After entering the URL and selecting the link behavior, save your changes or apply the link to the icon image. This process may involve clicking a “Save” or “Apply” button within the footer customization panel.
- Repeat for Other Icon Images: If you have multiple icon images in your footer that you want to link, repeat the above steps for each icon image individually.
- Preview and Test: Before finalizing your changes, preview your Shopify store to ensure that the linked icon images behave as expected. Click on the icons to confirm that they redirect users to the correct destinations.
- Save Your Changes: Once you are satisfied with the links and their functionality, save your modifications within the footer customization panel.
- Test Responsiveness: As always, test your store on different devices and web browsers to ensure that the linked icon images maintain their functionality and appearance across various screen sizes.
If you want to provide a more user-friendly way for your customers to access essential pages or external resources, you can add links to your icon images in the footer of your Shopify store. By doing this, you can direct your visitors to your social media profiles, contact page, or trusted partners, which can help to enhance their experience and encourage engagement with your store. Follow these simple steps to add clickable icon images to your Shopify store.
Preview and Save Changes
After you have made necessary adjustments, added icon images, and linked them in your Shopify footer, it’s crucial to preview these changes to ensure they look and function as you intended. Once you are satisfied with the results, you can save the modifications. Here’s how to do it:
- Preview Your Changes:
- Look for a “Preview” or “View” button within the footer customization panel. Click on it to see how your footer appears with the changes you’ve made.
- The preview mode typically opens your store in a new tab or window, allowing you to view the changes without affecting your live site.
- Inspect the Preview:
- Examine the appearance, layout, and functionality of your Shopify footer in the preview mode.
- Check that the icon images are correctly placed, aligned, and linked (if applicable).
- Verify that the footer looks good on various devices, including desktop, tablet, and mobile.
- Make Further Adjustments (If Needed):
- If you notice any issues or areas for improvement during the preview, return to the footer customization panel.
- Continue fine-tuning the placement, alignment, or links of your icon images until you’re satisfied with the result.
- Save Your Changes:
- Once you are confident that your Shopify footer looks and functions as desired, return to the footer customization panel.
- Look for a “Save” or “Publish” button, which is usually located at the bottom or top of the customization panel.
- Click the “Save” or “Publish” button to apply your changes to your live Shopify store.
- Confirm Changes on Your Live Store:
- After saving your modifications, visit your live Shopify store (not the preview) in a separate browser tab or window.
- Double-check that the changes you made to the footer, including icon placement and links, are reflected on your live site.
- Test Responsiveness Again:
- Test your store’s footer on different devices (desktop, tablet, mobile) and web browsers to ensure that your icon images and links adapt well to various screen sizes and maintain their functionality.
- Verify Links (If Applicable):
- If you’ve added links to your icon images, click on each icon in your live store to confirm that they correctly direct users to the intended destinations.
- Regularly Review and Update:
- Keep in mind that your Shopify store may evolve over time. Regularly review your footer and update icon images or links as needed to ensure they stay relevant and effective.
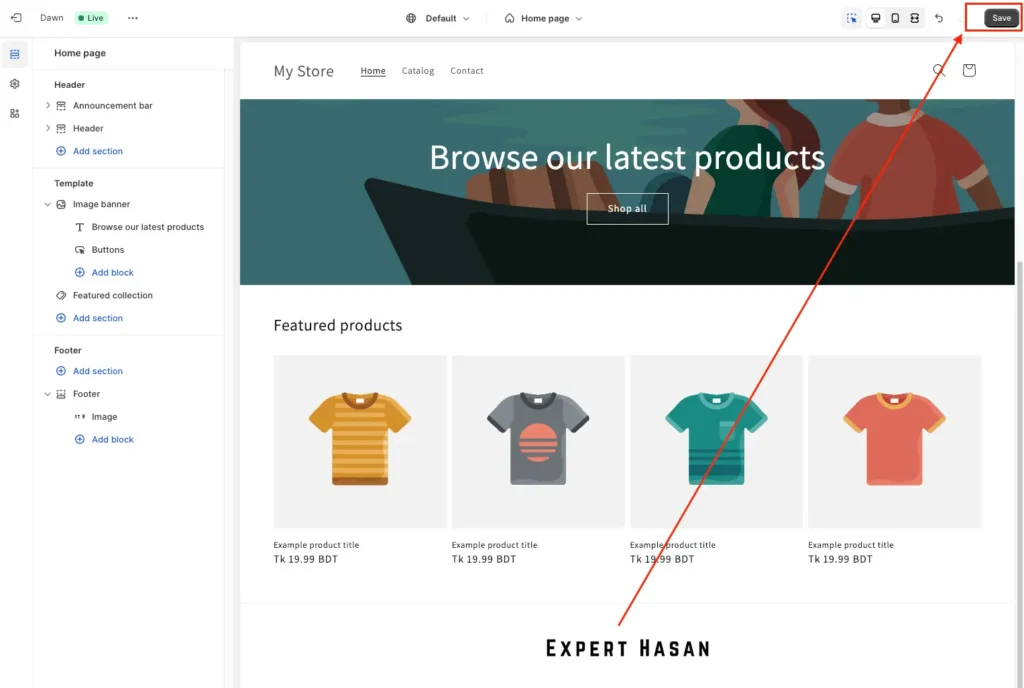
To ensure a flawless Shopify footer, you can follow these simple steps to preview your changes, save your customizations, and make your online business more successful with an appealing and functional footer. A well-designed footer can enhance user experience and engagement, making it an important element to consider while customizing your Shopify store.
Testing and Troubleshooting
Once you have made changes to your Shopify footer, it’s essential to test it carefully to verify that everything is working as expected. Moreover, it’s crucial to be ready to address any issues that may arise during the testing process. Here is a guide on how to test and troubleshoot your Shopify footer:
Testing:
- Device and Browser Testing:
- Test your Shopify footer on different devices (desktop, tablet, mobile) and web browsers (Chrome, Firefox, Safari, etc.) to ensure compatibility and responsiveness.
- Link Testing:
- If you’ve added links to your icon images, click on each icon to confirm that the links correctly navigate to the intended destinations.
- Test both internal links (within your Shopify store) and external links (to external websites or resources).
- Appearance and Alignment:
- Verify that your icon images maintain their placement and alignment across various screen sizes and orientations.
- Ensure that the spacing and proportions look visually appealing.
- Functionality Testing:
- If your footer includes interactive elements, such as forms or buttons, test their functionality to ensure they work correctly.
- Load Time Testing:
- Assess the load time of your store, especially if you’ve added multiple high-resolution images. Slow loading times can negatively impact user experience. Use tools like Google PageSpeed Insights to analyze and optimize load times.
Troubleshooting:
- Broken Links:
- If any of your links are broken or not working as expected, double-check the URLs you’ve entered for typos or errors.
- Ensure that the linked pages or external websites are accessible and functioning.
- Image Sizing Issues:
- If your icon images appear distorted, pixelated, or too small/large, revisit the image dimensions and file formats to ensure they match the recommended settings.
- Adjust the image dimensions within the footer customization panel if necessary.
- Alignment and Spacing Problems:
- If your icons are not properly aligned or spaced, return to the footer customization panel to adjust the margins, padding, or alignment settings.
- Responsiveness Challenges:
- If your footer doesn’t adapt well to different screen sizes, consider optimizing your CSS styles or using responsive design techniques.
- Test your store on various devices to identify specific responsiveness issues.
- Code Errors (Advanced):
- If you have custom code in your footer that is causing problems, review and validate your code to fix any syntax errors.
- If you’re not comfortable with code troubleshooting, seek assistance from a developer.
- Theme Compatibility (Advanced):
- In some cases, certain themes or apps may conflict with footer customizations. If you experience compatibility issues, consult your theme developer or app support for guidance.
- Regular Maintenance:
- Periodically review and update your footer, especially if you make changes to your website’s structure, navigation, or branding.
It’s important to test and troubleshoot your Shopify footer systematically. This way, you can quickly address any issues and ensure your website provides a seamless and user-friendly experience for your customers. Regular maintenance and quality assurance are essential to keep your Shopify store running smoothly.
Final Thoughts
Enhancing the visual appeal and functionality of your online store can be achieved by customizing your Shopify footer with icon images. A well-designed footer is a valuable source of information, improves navigation, and strengthens your brand identity. Below are some final thoughts and best practices you should consider:
- Consistency is Key: Maintain a consistent design style and color scheme throughout your footer to align with your overall brand identity and website aesthetics.
- Mobile-Friendly Design: Ensure that your footer is responsive and looks great on mobile devices, as a significant portion of web traffic comes from smartphones and tablets.
- User-Friendly Links: If you’ve added links to your icon images, make sure they are descriptive and provide value to users. Links should lead to relevant pages or resources.
- Regular Updates: Periodically review and update your footer to keep it current and relevant. This is particularly important for contact information, social media links, and payment icons.
- Testing and Optimization: Continuously test and optimize your footer to ensure it performs well in terms of user experience and page load times. Monitor how users interact with the footer to identify any areas for improvement.
- Accessibility: Keep accessibility in mind by providing alt text for your icon images and ensuring that all users, including those with disabilities, can access and understand your footer content.
- Professionalism: Your footer is a reflection of your brand’s professionalism. Take the time to make it look polished and error-free.
- Support and Resources: If you encounter challenges or have specific customization needs beyond your expertise, don’t hesitate to seek assistance from Shopify’s support team, a Shopify Expert, or a developer familiar with your theme.
It’s important to keep in mind that your Shopify store is constantly changing and developing, and the footer is only one part of its success. By continually improving and optimizing your footer, you can enhance the user experience, establish credibility with your customers, and ultimately increase conversions on your e-commerce platform.
Additional Resources
If you’re thinking about creating a website or expanding your online presence without coding, this resource could be helpful:
Read this: Can ChatGPT Create a Website? Create a website using ChatGPT
