Shopify is a powerful e-commerce solution that enables businesses to sell their products online, manage their inventory, and streamline their operations. To create customized solutions that leverage this vast e-commerce ecosystem, it’s crucial to know how to connect your high-level language to the Shopify API. This tutorial provides step-by-step instructions of how to connect high level to shopify api, allowing you to build applications that utilize Shopify’s functionality and enhance your e-commerce endeavors.
Join us as we embark on a journey to bridge the gap between your high-level language and the world of Shopify API integration, unlocking new possibilities for your online business.
Preparations
Before integrating your high-level language with the Shopify API, complete crucial preparatory steps. Follow this guide for a smooth process.

A. Create a Shopify Partner Account
- Sign up: If you don’t already have one, begin by signing up for a Shopify Partner account. This account is essential for managing your Shopify applications.
B. Create a Shopify App
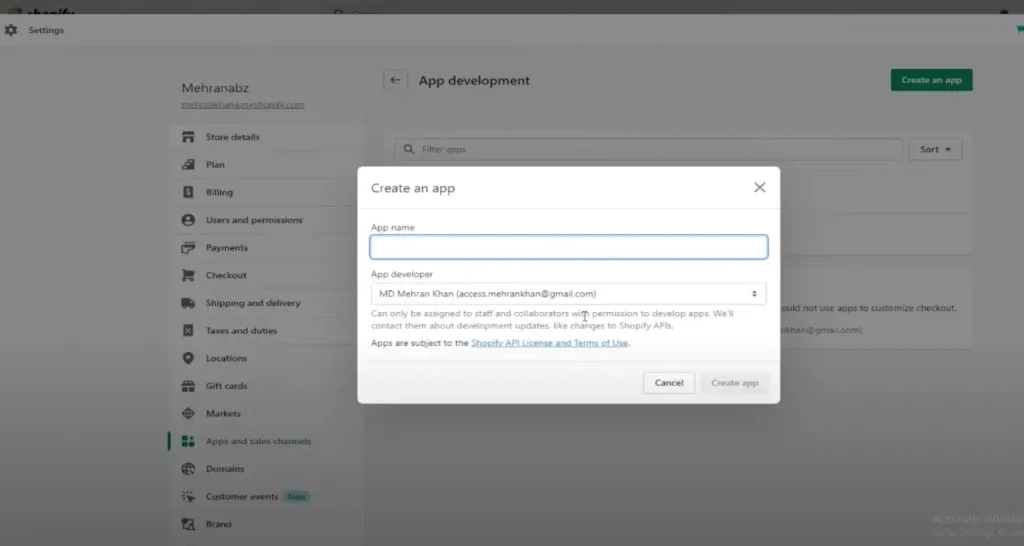
- Register a new app: Within your Shopify Partner account, register a new Shopify app. This will grant you access to the API credentials needed for integration.
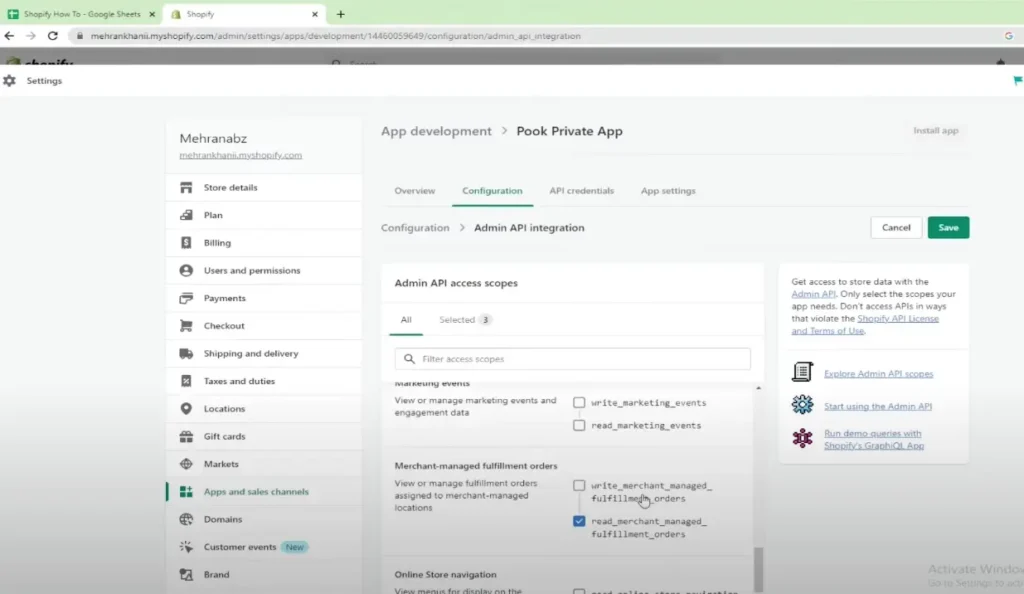
- App settings: Configure your app settings, including its name, permissions, and redirect URLs.
- Obtain API keys: Retrieve the API keys and credentials provided by Shopify for your app. These keys are essential for authenticating your requests.
C. Choose a High-Level Language
- Select a language: Choose the high-level programming language that you’re most comfortable with and is suitable for your project’s requirements.
- Check compatibility: Ensure that your chosen language is compatible with Shopify’s API libraries or SDKs. This will simplify the integration process.
D. Authentication Setup
- Obtain API Access Tokens: Use the API keys and credentials obtained in the previous step to obtain access tokens. These tokens will be used to authenticate your app’s requests to the Shopify API.
- Configure OAuth 2.0: Implement OAuth 2.0 authentication flow to secure your app’s access to the Shopify API. This ensures that only authorized applications can interact with Shopify.

Once you finish these preparations, you will have built the essential groundwork to effectively combine your high-level language with the Shopify API. In the following sections, we will provide you with detailed information about making API requests, managing data, and ensuring security throughout the integration process.
Choose a High-Level Language
Choosing the appropriate high-level programming language to integrate with the Shopify API is a critical decision. Your choice should depend on various factors such as your level of familiarity with the language, your project’s specific requirements, and the availability of suitable libraries or SDKs. To make an informed decision, consider the following factors:

A. Assess Your Familiarity
- Prior experience: Consider your proficiency in programming languages. Opt for a language you’re comfortable with or have experience in, as this will expedite development.
B. Project Requirements
- Functional requirements: Identify the specific functionalities you need to implement with the Shopify API. Certain languages might be better suited for particular tasks.
- Performance requirements: Evaluate if your project has performance demands, and choose a language that can meet those requirements efficiently.
C. Check for Shopify API Libraries/SDKs
- Library availability: Investigate whether there are existing Shopify API libraries or SDKs for your chosen language. These pre-built tools can simplify integration.
- Community support: Consider the size and activity of the development community around the language. A robust community can provide valuable resources and support.
D. Security Considerations
- Security features: Ensure that your chosen language has robust security features and libraries to handle data encryption and authentication.
E. Scalability and Future-Proofing
- Scalability: Think about the long-term scalability of your project. Is the language capable of handling potential growth in your application’s usage?
- Maintenance: Consider the availability of developers skilled in your chosen language to maintain and expand your integration over time.
F. Evaluate Other Factors
- Cost: Assess any licensing costs associated with using a particular language or libraries.
- Cross-platform compatibility: Determine if your chosen language can be used on multiple platforms if necessary.
When it comes to choosing a high-level language for your Shopify API integration, it’s important to consider your project’s objectives and your own level of expertise. Making an informed decision will lead to a smoother and more successful integration process in the later stages of your project. Therefore, take your time and choose wisely.
Authentication
When connecting your high-level language to the Shopify API, authentication is a crucial step to ensure secure interaction with Shopify’s resources. This section covers the essential aspects of authentication.

A. Obtain API Access Tokens
- API keys: Use the API keys and credentials provided by Shopify when you registered your app.
- Access tokens: Explain how to exchange API keys for access tokens, which are used for making authenticated API requests.
B. Configure OAuth 2.0
- OAuth 2.0 overview: Provide an overview of the OAuth 2.0 authentication flow, which is the recommended method for securing access to the Shopify API.
- Setting up OAuth in your app: a. Define your app’s OAuth settings, including redirect URIs and scopes. b. Explain how to register your app with Shopify’s OAuth service.
C. Authentication Flow
- Authorization request: Describe how your app initiates the authentication process by redirecting the user to Shopify’s authorization URL.
- User consent: Explain how the user provides consent to allow your app access to their store data.
- Token exchange: Detail the process of exchanging the authorization code for access and refresh tokens.
- Using access tokens: Describe how access tokens are included in API requests to authenticate your application.
D. Token Management
- Access token lifespan: Explain that access tokens have a limited lifespan and need to be refreshed.
- Refresh tokens: Discuss the use of refresh tokens to obtain new access tokens without requiring the user to re-authenticate.
- Security considerations: Highlight best practices for securely storing and managing access tokens and refresh tokens.
E. Error Handling
- Handling authentication errors: Explain how to handle errors that may occur during the authentication process, including invalid tokens or expired tokens.
By carefully considering and implementing authentication for your Shopify API integration, you’ll ensure that your application can securely access Shopify resources while protecting sensitive data. In the next sections, we will discuss making API requests, managing responses, and manipulating data to create an optimal integration.
Making API Requests: How to Connect High Level to Shopify API
It’s time to learn how to construct and send Shopify API requests for retrieving data and performing actions, now that your application is authenticated.
A. Set Up API Requests
- Choose API Endpoints: Identify the specific API endpoints you need to interact with based on your project’s requirements (e.g., products, orders, customers).
- API Request Methods: Understand the various HTTP methods (GET, POST, PUT, DELETE) and when to use them for different operations.
B. Handle Authentication Headers
- Include Access Tokens: Explain how to include access tokens obtained during authentication in the request headers.
- Additional Headers: Mention any other headers that may be required for specific requests, such as versioning or content type.
C. Make API Requests
- Construct Request URLs: Demonstrate how to build the complete URL for API requests, including endpoint, parameters, and query strings.
- Request Payload: Explain how to include data payloads for POST and PUT requests when creating or updating resources.
D. Handle API Responses
- Response Codes: Explain the significance of HTTP response status codes (e.g., 200 OK, 201 Created, 404 Not Found) and how to interpret them.
- Response Data: Describe how to parse and extract data from the API response, which typically comes in JSON format.
- Error Handling: Discuss how to handle errors returned by the API, including error messages and codes.
E. Pagination
- Pagination Overview: Explain how Shopify paginates large sets of data and how to navigate through paginated results.
- Implement Pagination: Provide code examples or instructions on how to handle pagination in API requests.
F. Rate Limiting
- Understanding Rate Limits: Describe Shopify’s rate limiting policies and how to check your current rate limit status.
- Rate Limit Management: Explain strategies for managing API requests to avoid exceeding rate limits.
G. Example API Requests: How to Connect High Level to Shopify API
- Practical Examples: Provide real-world examples of API requests commonly used in Shopify integrations, such as retrieving product details or creating orders.
Effective manipulation of store data is achievable by mastering the art of making API requests to Shopify. The following sections will delve into data retrieval, manipulation, error handling, and testing to complete your integration project.

Make API Requests Example
Here is an example of how to use Python to make API requests to the Shopify API. We will be using the requests library to demonstrate how to interact with the API. Please keep in mind that in a real application, it is important to handle errors, rate limiting, and pagination more efficiently.
import requests

# Your Shopify store URL and access token
shopify_url = "https://your-shop-name.myshopify.com"
access_token = "your-access-token"

# Example: Retrieve a list of products
def get_products():
    url = f"{shopify_url}/admin/api/2021-07/products.json"
    headers = {
        "Content-Type": "application/json",
        "X-Shopify-Access-Token": access_token,
    }

    response = requests.get(url, headers=headers)

    if response.status_code == 200:
        # Parse and process the JSON response
        products = response.json()["products"]
        for product in products:
            print(f"Product ID: {product['id']}, Title: {product['title']}")
    else:
        print(f"Error: {response.status_code} - {response.text}")

# Example: Create a new product
def create_product(title, price):
    url = f"{shopify_url}/admin/api/2021-07/products.json"
    headers = {
        "Content-Type": "application/json",
        "X-Shopify-Access-Token": access_token,
    }
    payload = {
        "product": {
            "title": title,
            "variants": [
                {
                    "price": price,
                }
            ],
        }
    }

    response = requests.post(url, headers=headers, json=payload)

    if response.status_code == 201:
        print("Product created successfully.")
    else:
        print(f"Error: {response.status_code} - {response.text}")

# Example usage
get_products()
# create_product("New Product", "29.99")
In this Python example:
- We import the
requestslibrary for making HTTP requests. - Replace
"your-shop-name.myshopify.com"with your Shopify store’s URL and"your-access-token"with your access token. - We provide two functions:
get_productsto retrieve a list of products andcreate_productto create a new product. - The
get_productsfunction sends a GET request to Shopify’s product endpoint, parses the JSON response, and prints the product IDs and titles. - The
create_productfunction sends a POST request to create a new product with the given title and price.
Uncomment the create_product function call to create a new product in your Shopify store.
Data Retrieval and Manipulation
It’s time to access and manipulate Shopify’s resources via API requests for your application.
A. Retrieve Store Data
- Product Data Retrieval:
- Explain how to retrieve product information, including titles, descriptions, prices, and images.
- Order Data Retrieval:
- Describe how to fetch order details, such as customer information, order items, and order status.
- Customer Data Retrieval:
- Provide examples of retrieving customer data, including contact information and order history.
- Custom Data Retrieval:
- Mention how to access custom data, such as metafields or tags associated with products, orders, or customers.
B. Manipulate Data
- Create New Records:
- Explain how to create new products, orders, or customers through the Shopify API.
- Update Existing Records:
- Describe the process of updating product details, order statuses, or customer information.
- Delete Records:
- Discuss how to delete products, orders, or customer records if necessary.
- Data Transformation:
- Demonstrate techniques for transforming and reformatting data to suit your application’s needs.
C. Error Handling and Validation
- Handling Data Errors:
- Explain how to handle errors that may occur during data retrieval or manipulation, including validation errors.
- Data Validation:
- Emphasize the importance of validating data before sending updates to ensure data integrity.
D. Working with Webhooks
- Webhook Overview:
- Briefly explain how webhooks can be used to receive real-time updates from Shopify.
- Webhook Registration:
- Describe how to register webhooks in your Shopify app to receive notifications for specific events.
- Handling Webhook Payloads:
- Provide guidance on processing and handling webhook payloads in your application.
E. Best Practices for Data Retrieval
- Batching and Throttling:
- Discuss strategies for efficient data retrieval, such as batching requests and managing API rate limits.
- Caching Data:
- Explain the benefits of caching frequently accessed data to reduce API requests.
To fully utilize Shopify’s resources and seamlessly integrate with your high-level language, it is imperative to have a strong understanding of data retrieval and manipulation techniques. In the upcoming section, we will discuss error handling and security measures to ensure that your application is reliable and secure.
Implement Error Handling
It is crucial to have robust error handling when connecting your high-level language to the Shopify API. Properly managing errors ensures that your application can recover gracefully from unexpected situations, providing a better user experience. This section will cover different aspects of error handling.
A. Common Shopify API Errors
- HTTP Status Codes:
- Explain common HTTP status codes you may encounter when interacting with the Shopify API (e.g., 200, 400, 401, 404, 429, 500).
- Error Response Structure:
- Describe the structure of Shopify’s error responses, including error messages and error codes.
B. Handling API Rate Limits
- Rate Limiting Overview:
- Explain Shopify’s rate limiting mechanisms and how they can affect your application’s performance.
- Retry Strategies:
- Discuss strategies for handling rate limiting, such as exponential backoff and retry mechanisms.
- Rate Limit Headers:
- Describe how to interpret rate limit headers in Shopify API responses.
C. Error Handling Techniques
- Try-Catch Blocks:
- Explain the use of try-catch blocks (or equivalent error-handling constructs in your language) to catch exceptions and errors.
- Logging Errors:
- Stress the importance of logging errors to aid in debugging and monitoring.
- Error Messages:
- Customize error messages to provide meaningful feedback to users or developers.
- Retrying Failed Requests:
- Detail how to implement automatic retries for API requests that fail due to transient errors.
D. Security Considerations
- Sensitive Data Handling:
- Explain how to handle errors involving sensitive data, such as access tokens, securely.
- Rate Limiting for Security:
- Emphasize that rate limiting can also serve as a security measure against potential abuse.
E. Testing Error Scenarios
- Testing Environments:
- Encourage setting up separate testing environments for simulating error scenarios without impacting production.
- Unit Testing:
- Explain the importance of unit testing to ensure that error-handling code functions correctly.
F. Documentation and User Communication
- User-Friendly Error Messages:
- Discuss the benefits of providing clear, user-friendly error messages to help users troubleshoot issues.
- Error Code Reference:
- Consider creating an error code reference document to aid in debugging and support.
To ensure that your application continues to function smoothly even in the face of unexpected challenges, it is crucial that you implement effective error handling in your Shopify API integration. In the next section, we will explore the security considerations that need to be taken into account in order to protect your integration and user data.
Testing
Testing is a pivotal phase in the development process of your Shopify API integration. It plays a crucial role in identifying and addressing issues that can hinder the reliability and security of your application. In this section, we will discuss the various aspects of testing your integration to ensure that it functions properly and securely.

A. Create Test Cases
- Test Plan:
- Explain the importance of creating a test plan that outlines the scope and objectives of your testing.
- Identify Test Scenarios:
- Describe how to identify specific test scenarios for different aspects of your integration (e.g., authentication, data retrieval, data manipulation).
- Edge Cases:
- Emphasize the need to test edge cases and unusual scenarios to uncover potential vulnerabilities.
B. Types of Testing
- Unit Testing:
- Explain the concept of unit testing and how it helps test individual components or functions in isolation.
- Integration Testing:
- Discuss integration testing, which focuses on testing the interactions between different parts of your application.
- End-to-End (E2E) Testing:
- Describe end-to-end testing, where you simulate real user interactions with your application to ensure that it functions as expected.
C. Automated Testing
- Benefits of Automation:
- Explain the advantages of automated testing, including repeatability and efficiency.
- Testing Frameworks:
- Recommend testing frameworks or tools suitable for your high-level language.
- Writing Test Cases:
- Provide examples of writing automated test cases for key integration functionalities.
D. Manual Testing
- User Testing:
- Discuss the importance of having real users or testers conduct manual testing to provide feedback on usability.
- Exploratory Testing:
- Explain exploratory testing as a way to discover issues that might not be covered by automated tests.
E. Regression Testing
- Definition:
- Define regression testing and its significance in ensuring that new code changes do not introduce new defects.
- Continuous Integration (CI):
- Discuss how to set up continuous integration pipelines that automatically run tests when code changes are pushed.
F. Testing Environments
- Staging Environment:
- Recommend the use of a staging environment that closely mirrors the production environment for testing.
- Isolation:
- Emphasize the importance of isolating testing environments to avoid impacting production data.
G. Performance and Load Testing (Optional)
- Mention the option of conducting performance and load testing to assess how your application handles high volumes of API requests.
H. Documentation
- Test Case Documentation:
- Stress the importance of documenting test cases, including their expected outcomes and results.
- Bug Tracking:
- Discuss how to track and manage identified issues or bugs.
It is crucial to conduct a comprehensive testing of your Shopify API integration to identify and address potential issues early in the development phase. This will ensure that your application functions consistently and meets the expectations of your users. In the upcoming section, we will examine the security aspects that you need to consider to safeguard your integration and user data.
Security Considerations
When connecting your high-level language to the Shopify API, prioritizing security is essential to avoid data breaches and other vulnerabilities. This section outlines key security considerations.
A. Secure API Credentials
- Protection of API Keys and Tokens:
- Emphasize the importance of safeguarding API keys, access tokens, and other credentials.
- Secret Management:
- Explain how to securely manage and store sensitive information, such as using environment variables or a secure storage mechanism.
B. Data Encryption
- Data in Transit:
- Describe how to ensure that data transmitted between your application and Shopify is encrypted using protocols like HTTPS.
- Data at Rest:
- Explain strategies for encrypting data stored in your application’s databases or storage.
C. User Authentication (If Applicable)
- User Access Control:
- Discuss the implementation of user authentication and authorization mechanisms if your application involves user accounts.
- Password Security:
- Provide guidelines for securely storing and managing user passwords, including best practices such as password hashing.
D. Handling Webhooks Securely
- Webhook Verification:
- Explain how to verify the authenticity of incoming webhooks to prevent malicious or spoofed requests.
- Webhook Endpoint Security:
- Describe how to secure your webhook endpoints to accept requests only from trusted sources.
E. Rate Limiting for Security
- Rate Limiting Overview:
- Reiterate the use of rate limiting not only for performance but also as a security measure against potential abuse or attacks.
F. Error Handling and Disclosure
- Custom Error Messages:
- Advise against exposing detailed error messages to end-users, which might reveal sensitive information.
- Logging Security:
- Ensure that sensitive data is not logged and that logs are adequately protected.
G. Third-Party Libraries and Dependencies
- Dependency Scanning:
- Highlight the importance of regularly scanning third-party libraries for known vulnerabilities.
- Patch Management:
- Describe how to keep dependencies up to date with security patches.
H. Compliance and Regulations (If Applicable)
- If your application handles specific types of data or serves particular markets, discuss any industry-specific compliance requirements (e.g., GDPR, PCI DSS) and how to meet them.
I. Security Audits and Penetration Testing (Optional)
- Mention the option of conducting security audits or penetration testing to identify vulnerabilities.
J. Incident Response Plan
- Encourage the development of an incident response plan to handle security breaches or data incidents effectively.
Deployment
It’s time to deploy your Shopify API integration after thorough testing. This guide covers best practices for launching your application in a production environment.
A. Preparing for Production
- Configuration Updates:
- Explain how to update configuration settings to transition from development to production mode.
- Environment Variables:
- Highlight the use of environment variables for securely storing sensitive information.
- Double-Check Credentials:
- Verify that all API keys and access tokens are correctly configured for the production environment.
B. Choosing a Hosting Environment
- Hosting Options:
- Discuss different hosting options, such as cloud hosting providers (e.g., AWS, Azure, Google Cloud) or dedicated servers.
- Scalability Considerations:
- Address how your chosen hosting environment can scale to handle increased traffic and usage.
C. Deployment Process
- Continuous Integration/Continuous Deployment (CI/CD):
- Describe how to set up CI/CD pipelines to automate the deployment process.
- Deployment Scripts:
- Provide guidance on creating deployment scripts or automation tools for a smooth deployment process.
- Rollback Plan:
- Discuss the importance of having a rollback plan in case issues arise during deployment.
D. Monitoring and Maintenance
- Monitoring Tools:
- Recommend monitoring tools or services for tracking application performance, errors, and security threats.
- Alerting System:
- Set up alerting systems to notify you of critical issues or anomalies.
- Regular Updates:
- Stress the importance of keeping your application and dependencies up to date with security patches and updates.
- Backups and Data Recovery:
- Detail backup strategies to ensure data recovery in case of data loss or system failures.
E. Scalability and Performance
- Scalability Planning:
- Discuss strategies for scaling your application as your user base grows.
- Performance Optimization:
- Provide guidelines for optimizing the performance of your integration, including database optimizations and caching strategies.
F. Documentation and Knowledge Transfer
- Documentation Update:
- Ensure that your documentation is up to date, reflecting any changes made during deployment.
- Knowledge Transfer:
- Consider creating documentation or conducting knowledge transfer sessions for your team or future maintainers.
G. Testing in Production (Optional)
- Discuss the option of conducting testing in the production environment after deployment to validate that everything is working as expected.
H. Post-Deployment Checks
- Outline a series of checks to perform immediately after deployment to ensure the application is functioning as intended.
By following best practices in deployment, you can ensure a smooth transition from development to production, maintain the reliability of your integration, and be prepared to handle any issues that may arise in a live environment. Hopefully now you understand how to connect high level to shopify api
Additional
Discover how to enhance the visual appeal of your Shopify store’s footer with icon images. Our step-by-step guide will walk you through the process, ensuring your website stands out with a professional touch. Read the full article here.

