Link colors are crucial for shaping a website’s user experience and aesthetics. WordPress provides a user-friendly platform for customizing various aspects, including link colors. This guide will take you through the process of how to change link color in wordpress, from quick changes using the Theme Customizer to advanced customization using the theme’s stylesheet.
We will also emphasize the importance of choosing accessible link colors. Whether you’re a blogger, business owner, or have a WordPress website, let’s dive into the world of link color customization and make your website truly yours.
How to Change Link Color in WordPress: Understanding Link Colors
The design of websites is heavily influenced by the colors used for links. Understanding the significance of linking colors is vital before customizing.
A. Importance of Link Colors
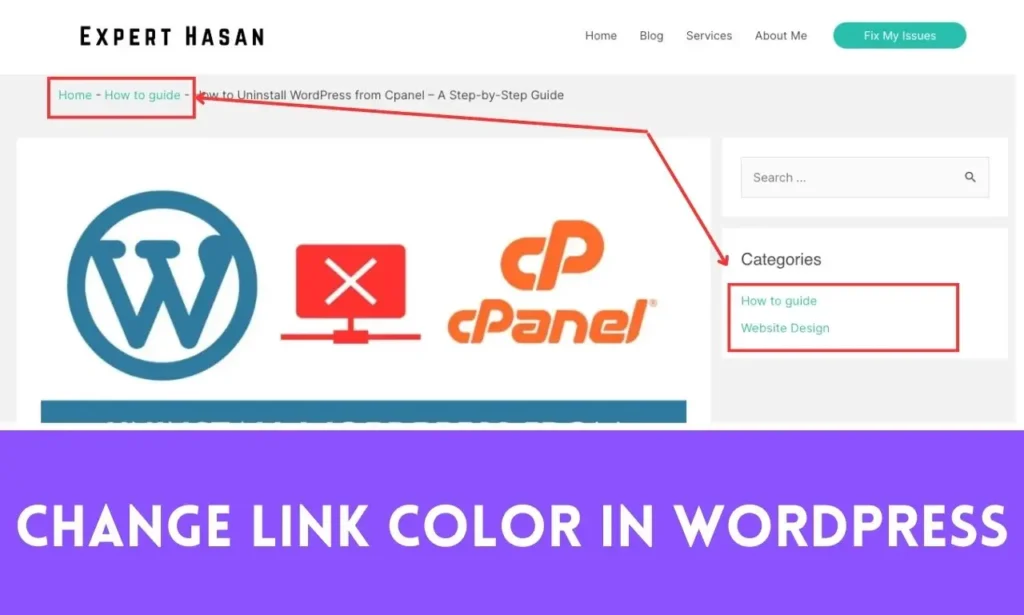
- Navigation: Link colors are like signposts that guide users through your website. They indicate which parts of the content are clickable and lead to other pages or resources.
- User Experience: Well-chosen link colors can enhance user experience by making it clear where users can find additional information or take action.
- Branding: Link colors often align with your website’s branding, reinforcing your visual identity and creating a consistent look and feel.
- Accessibility: Link colors can impact the accessibility of your website. Properly contrasting link colors are essential for users with visual impairments.
B. Default Link Colors in WordPress Themes
- Varies by Theme: Link colors in WordPress can vary depending on the theme you’re using. Most themes come with default link colors that match the theme’s design.
- Link States: Links in WordPress typically have various states, such as normal, hover, and visited. Each of these states can have different colors to provide visual feedback to users.
- Customization Potential: While themes provide default link colors, WordPress allows for extensive customization, enabling you to tailor link colors to your specific preferences and needs.
It is crucial to grasp the importance of link colors and their role in order to make informed decisions when it comes to customizing them on your WordPress website. In the following sections, we will delve into how to take charge of these link colors to craft a distinctive and user-friendly online experience.
Identifying the Theme
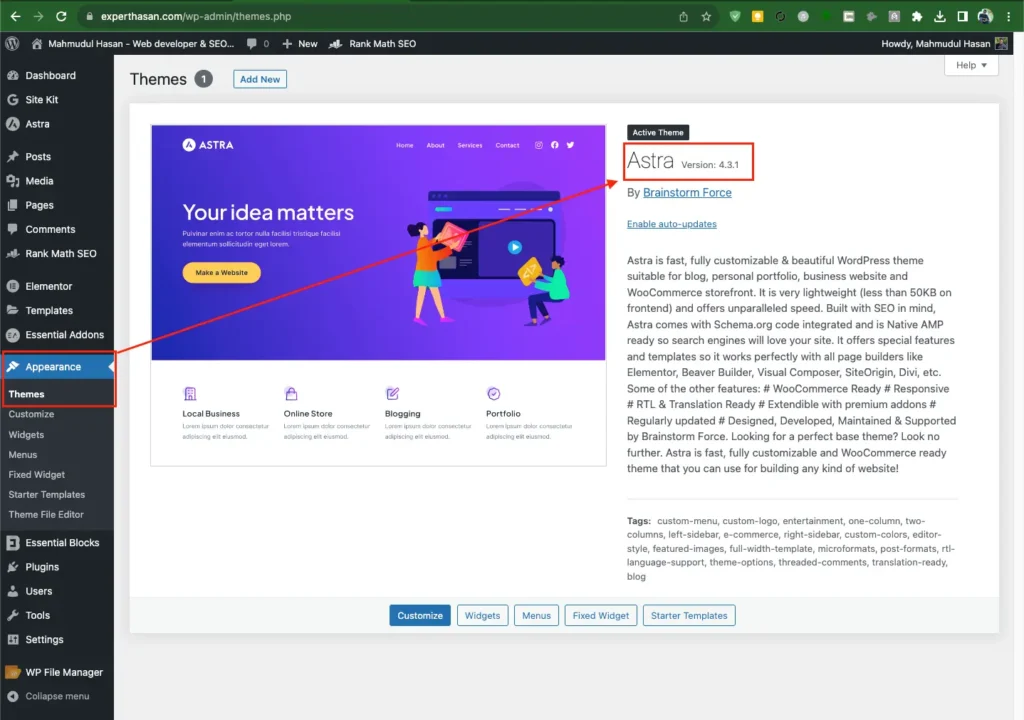
If you want to change the link colors on your WordPress website, it’s essential to know which theme you’re using. Typically, the link colors are determined by the theme’s CSS. To find out which theme is currently active on your WordPress site, follow these steps:

- Log In: If you’re not already logged in, log in to your WordPress admin dashboard.
A. Accessing the WordPress Dashboard
B. Navigating to the Themes Section
- Go to Appearance: In the WordPress dashboard, navigate to the “Appearance” section. You can typically find it in the left-hand sidebar.
- Click on “Themes”: Under the “Appearance” section, click on the “Themes” option. This will take you to the themes management page.
C. Identifying the Active Theme
- Locate the Active Theme: On the “Themes” page, you’ll see a list of available themes. The active theme is usually highlighted or has an “Active” label. This is the theme that’s currently in use on your website.
- Take Note of the Theme Name: Identify and note down the name of the active theme. This is the theme you’ll need to work with to customize link colors.
After identifying your WordPress theme, you can proceed with changing the link colors. The method you choose depends on your theme. You can either use the WordPress Customizer, edit the theme’s stylesheet (CSS), or utilize a plugin to achieve your desired link colors. In the upcoming sections of this guide, we will cover each of these options in detail.
Using Theme Customizer
The WordPress Customizer is a user-friendly tool that enables you to customize your website easily, including changing link colors. Here’s a step-by-step guide on how to use the Theme Customizer to modify link colors:

A. Accessing the WordPress Customizer
- Log In: Ensure that you’re logged in to your WordPress admin dashboard.
- Navigate to the Customizer: From the dashboard, go to the “Appearance” section in the left-hand sidebar.
- Click on “Customize”: Click on the “Customize” option. This will launch the WordPress Customizer.
B. Locating Link Color Settings
- Find the “Colors” or “Typography” Section: The location of link color settings may vary depending on your theme. Look for sections related to “Colors,” “Typography,” “Fonts,” or “Additional CSS.”
- Explore Link Color Options: Within the relevant section, you should find options to modify link colors. These options may include settings for link text color, link hover color, and visited link color.
C. Making Link Color Changes
- Click on the Color Picker: To change a link color, click on the color picker next to the specific option you want to modify (e.g., “Link Text Color” or “Link Hover Color”).
- Select a New Color: A color picker tool will appear, allowing you to choose a new color. You can either select a color from the palette or enter a specific color code if you have one.
- Preview the Changes: As you select a new color, the preview of your website will update in real-time. This allows you to see how the new link color will look.
- Adjust Other Link Colors: Repeat the process for other link color options if needed, such as hover and visited link colors.
D. Saving Changes
- Save Your Changes: Once you’re satisfied with the new link colors, click the “Save” or “Publish” button in the Customizer to save your modifications.
- Review Your Site: Visit your website to ensure that the link colors have been updated according to your preferences.

If you’re looking to change the link colors in your WordPress theme but don’t want to write any code, the WordPress Customizer is a convenient option. However, if you have a specific color scheme in mind or need more advanced customization, editing the theme’s stylesheet (CSS) might be a better choice. We’ll cover this option in a later section of this guide.
Editing Theme’s Stylesheet (Advanced)
If you want to have more precise control over your link colors or your WordPress theme doesn’t offer custom options in the Customizer, you can make changes to the theme’s stylesheet (CSS) directly. Although this method allows for advanced customization, it requires some basic understanding of CSS. Below are the steps on how to do it:
A. Accessing the Theme’s Stylesheet
- Log In: Log in to your WordPress admin dashboard.
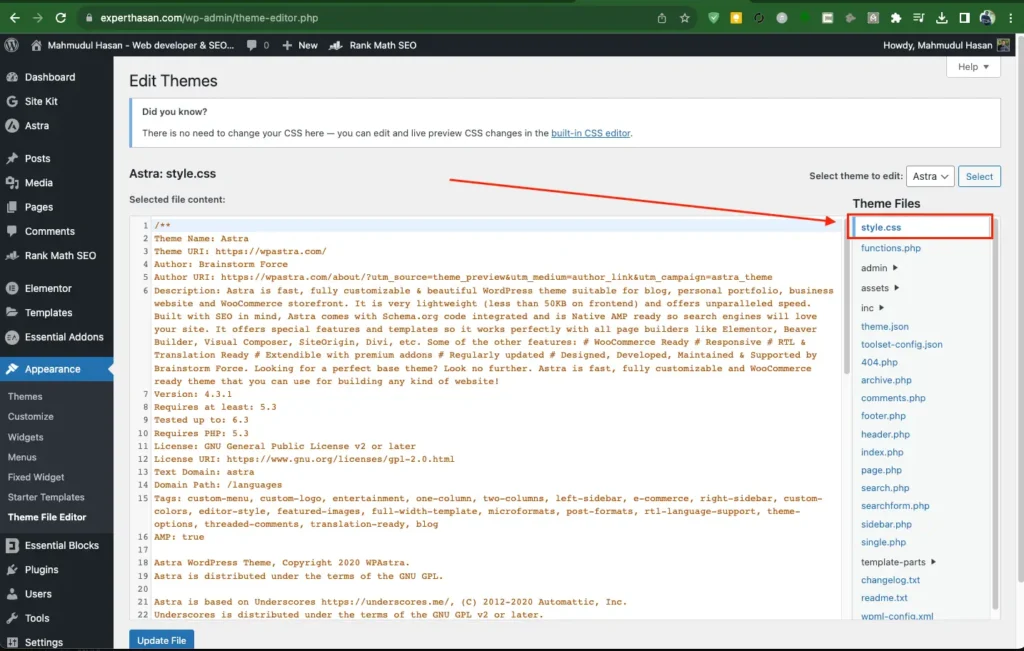
- Navigate to the Theme Editor: From the dashboard, go to the “Appearance” section in the left-hand sidebar.
- Click on “Theme Editor”: Click on the “Theme Editor” option. This will open the theme editor interface.
B. Locating the Stylesheet
- Select the Theme to Edit: In the top-right corner of the theme editor, select the theme you want to edit from the dropdown menu. Ensure that you choose the active theme.
- Find the Stylesheet (style.css): In the list of theme files on the right-hand side, look for the “style.css” file. This is the main stylesheet for your theme and where you’ll make your link color changes.

C. Editing Link Colors
- Edit the CSS: Click on the “style.css” file to open it for editing. Look for the section of CSS code that controls link colors. This may include selectors like
a,a:visited, anda:hover. - Modify the CSS Rules: To change link colors, you can modify the CSS rules associated with the link selectors. For example, to change the color of regular links, you might use:
a {
    color: #FF0000; /* Replace with your desired color code */
}
Adjust the color property to set your desired link color. You can do the same for visited and hover states.
D. Preview and Save Changes
- Preview Your Changes: Before saving, you can preview your changes by visiting your website in a separate browser tab.
- Save Your Changes: If you’re satisfied with the new link colors, click the “Update File” button in the theme editor to save your modifications.
E. Note on Best Practices
- Backup and Child Themes: It’s essential to back up your theme’s stylesheet before making changes. Additionally, consider using a child theme to ensure that your customizations won’t be overwritten when the theme updates.
Editing your theme’s stylesheet provides complete control over link colors; however, doing so requires care and some knowledge of CSS. Alternatively, plugins provide another non-code solution for changing link colors which we will discuss next section.
Using Plugins (Alternative Method)
If you prefer an easy and user-friendly way to customize link colors in WordPress, plugins provide a useful solution. There are various plugins available which offer straightforward methods of changing link colors; here is a step-by-step guide that shows you how:
- Log In: Log in to your WordPress admin dashboard.
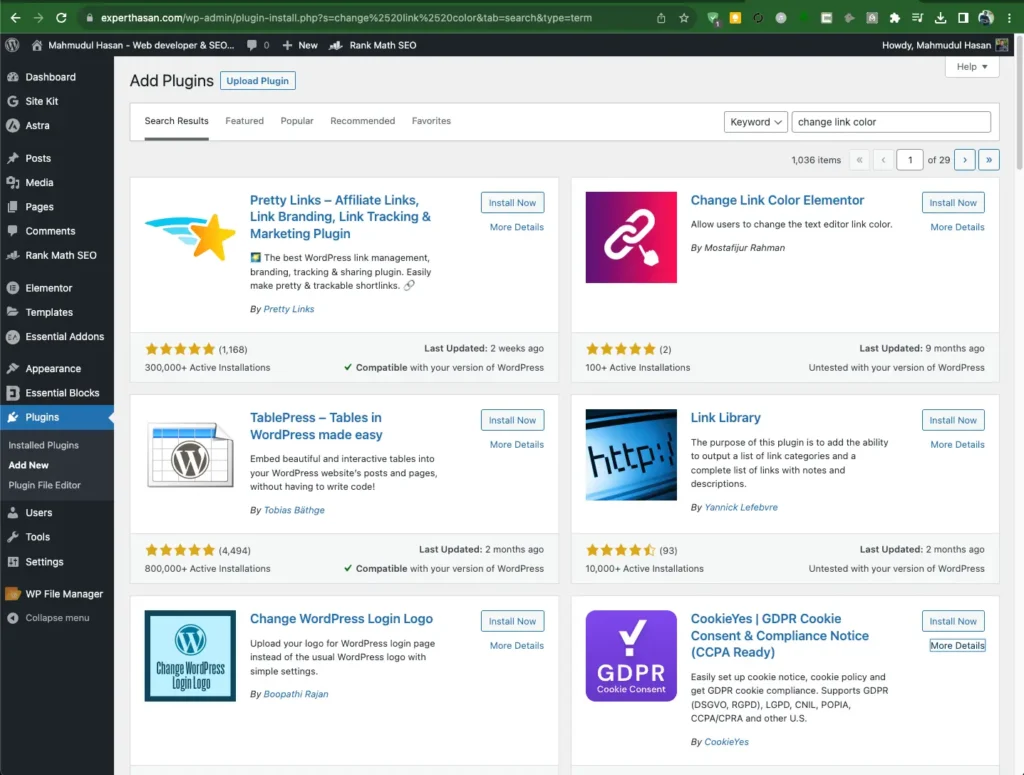
- Navigate to Plugins: In the left-hand sidebar of the dashboard, click on “Plugins.”
- Click on “Add New”: This will take you to the plugin installation page.
A. Accessing WordPress Plugins
B. Search for Link Color Plugins
- Search for a Plugin: In the search bar at the top right, enter keywords like “link color“, “custom link colors” or similar terms.
- Browse Plugin Options: Review the list of available plugins that match your search criteria. Pay attention to user ratings, reviews, and the number of active installations to choose a reputable plugin.
- Install a Plugin: Click the “Install Now” button next to the plugin you’ve selected.
- Activate the Plugin: After installation, click the “Activate” button to activate the plugin on your WordPress site.

C. Configure the Plugin
- Access Plugin Settings: Depending on the plugin you’ve chosen, there may be a dedicated settings page in the WordPress dashboard under “Settings” or a new menu item related to link colors.
- Customize Link Colors: Use the plugin’s interface to customize link colors. This typically involves selecting colors for regular links, visited links, and links in hover states.
- Save Your Changes: Be sure to save your changes using the “Save” or “Update” button provided by the plugin.
D. Preview Your Website
- Preview Your Website: Open your website in a new browser tab to see the updated link colors. Ensure that they match your desired look and feel.
E. Plugin Considerations
- Plugin Compatibility: Ensure that the plugin you choose is compatible with your WordPress version and other plugins and themes you’re using.
- Regular Updates: Select a plugin that is actively maintained and receives regular updates to stay current with WordPress changes.
Installing plugins is an ideal choice if you prefer a non-technical approach to customizing link colors in WordPress. They offer an accessible means to achieve the look you’re going for without needing to edit code or mess around in the theme’s stylesheets. Just be mindful when installing and choosing only reliable ones from the WordPress Plugin Repository.
Accessibility Considerations
When customizing link colors on your WordPress website, accessibility must always be kept in mind. Accessible link colors ensure all users – including those with visual impairments and disabilities – can effectively navigate your site. Here are some essential accessibility considerations when customizing link colors:
A. Contrast Ratio
- Understand Contrast: Pay attention to the contrast ratio between the link text and the background color. The higher the contrast, the more accessible the links are.
- Use Contrast Checkers: Utilize online contrast checking tools or accessibility plugins to verify that your chosen link colors meet the minimum contrast ratios required by accessibility guidelines, such as WCAG (Web Content Accessibility Guidelines).
- Avoid Low Contrast: Avoid using link colors that are too similar to the background color, as this can make links hard to distinguish for users with visual impairments.
B. Consistency
- Maintain Consistency: Keep link colors consistent throughout your website. Links should appear and behave in the same way across all pages.
- Underline or Other Indicators: Consider using additional visual indicators, such as underlines or bold text, in addition to color changes, to make links more noticeable.
C. Focus States
- Highlight Focus: Ensure that links have a visible focus state (often a border or outline) when they are selected or activated using keyboard navigation. This helps users who navigate without a mouse.
- Test Keyboard Navigation: Test your website’s links using keyboard navigation to verify that the focus state is clear and easy to see.
D. Avoid Red-Green Colorblindness Issues
- Avoid Red-Green Combinations: Red-green colorblindness is common, so avoid using only these colors to convey important information or actions.
E. Test with Accessibility Tools
- Accessibility Testing: Use accessibility testing tools and screen readers to evaluate your website’s link colors and overall accessibility.
F. Provide Alternative Text
- Alt Text for Images: If your links include images, ensure that each image link has appropriate alternative text (alt text) to describe the linked content. This is vital for screen reader users.
G. Regular User Testing
- User Feedback: Gather feedback from users, including those with disabilities, to identify any accessibility issues related to link colors and make necessary improvements.
H. Documentation
- Document Accessibility Choices: Keep records of your accessibility choices, including link color selections, in your website’s documentation for reference and compliance.
It’s crucial to think about accessibility when selecting link colors to make your website more inclusive and user-friendly for all visitors. Accessibility is not only a legal obligation in many areas, but it’s also a basic principle of web design that enhances the overall user experience.
Testing and Feedback
Once you’ve updated the link colors on your WordPress website, it is crucial that you carefully assess them and obtain user feedback on them. Doing this ensures that they are effective, accessible and well received – here’s how you can do it:
A. Testing Your Website
- Cross-Browser Testing: Check your website’s link colors in various web browsers (e.g., Chrome, Firefox, Safari, Edge) to ensure consistency and compatibility.
- Responsive Testing: Test your website’s link colors on different devices (desktop, tablet, mobile) to ensure that they look good and function well across all screen sizes.
- Keyboard Navigation: Use keyboard navigation to test the focus states and accessibility of links, ensuring they are easy to navigate without a mouse.
- Screen Reader Testing: Test your website’s link colors with a screen reader to verify that they are properly announced and that alt text for linked images is accurate.
- Contrast Testing: Re-check link color contrast ratios using online contrast checking tools to confirm compliance with accessibility guidelines.
- User Scenarios: Go through common user scenarios on your website to ensure that link colors effectively guide users to the desired actions or content.
B. Gathering User Feedback
- Usability Testing: Conduct usability testing with a diverse group of users, including those with disabilities, to gather feedback on the usability and effectiveness of link colors.
- Feedback Forms: Implement feedback forms on your website, asking users for their opinions on the link colors and their overall experience.
- Surveys and Polls: Create surveys or polls to collect user preferences regarding link colors, providing insights into what resonates with your audience.
- Social Media and Online Communities: Seek feedback on social media platforms or relevant online communities by sharing specific questions or polls related to link colors.
- Monitor Analytics: Analyze website analytics to track user behavior and interactions with links, which can provide insights into the effectiveness of your chosen link colors.
- A/B Testing: If feasible, consider conducting A/B tests with different link color schemes to determine which one performs better in terms of user engagement and conversion rates.
C. Iteration and Refinement
- Implement Changes: Based on the feedback received, make necessary adjustments to your link colors, focusing on areas where improvements are suggested.
- Document Feedback: Keep a record of user feedback and the changes you make in response. This documentation can guide future design decisions.
- Regular Evaluation: Periodically re-evaluate your link colors to ensure they remain effective and continue to meet the needs of your users.
Keep in mind that website design is an ongoing process and user feedback can help guide improvements. By testing link colors and collecting user input, you can refine the design of your website for a more engaging and user-friendly experience for visitors.
Troubleshooting Common Issues
Customizing link colors in WordPress may cause various issues that affect its appearance and functionality, including issues that affect link colors themselves and can hinder your site’s appearance and functionality. Here are some common problems and their solutions:
A. Link Colors Not Changing
- Cache Issue: Clear your browser cache to ensure you’re viewing the latest version of your website with updated link colors.
- Plugin or Theme Conflict: If you’re using a plugin or theme to customize link colors, check for conflicts with other plugins or themes. Disable conflicting components and test again.
- CSS Specificity: In CSS, ensure that your custom link color rules have sufficient specificity to override any conflicting styles. Use more specific selectors if necessary.
B. Accessibility Issues
- Low Contrast: If link colors do not meet accessibility standards, adjust them to improve contrast ratios. Use online contrast checkers to ensure compliance with WCAG guidelines.
- Missing Focus States: Ensure that links have visible focus states, such as outlines or borders, for keyboard navigation. Test your website with keyboard navigation to verify focus states.
C. Broken Links
- Typographical Errors: Check for typos or errors in the URLs of your links. Ensure that they point to the correct pages or resources.
- Permalink Structure: If you’ve recently changed your website’s permalink structure, some links may break. Update internal links accordingly.
D. Mobile Responsiveness
- Responsive Design: If link colors appear differently on mobile devices, use CSS media queries to target specific screen sizes and adjust link colors accordingly.
E. Plugin Issues
- Outdated Plugins: Ensure that all plugins related to link color customization are up-to-date. Outdated plugins can cause compatibility issues.
F. Theme Issues
- Theme Updates: If you’ve customized link colors via the theme’s stylesheet, theme updates may overwrite your changes. Consider using a child theme to preserve customizations.
- Child Theme: If you’re using a child theme, verify that your link color customizations are correctly applied in the child theme’s CSS file.
G. Browser Compatibility
- Browser-Specific CSS: Some browsers interpret CSS differently. Use browser-specific CSS rules with appropriate prefixes (e.g.,
-webkit-,-moz-) to ensure compatibility.
H. JavaScript Conflicts
- JavaScript Errors: Check for JavaScript errors in your browser’s console that may interfere with link color changes. Resolve any conflicting scripts.
I. Backup and Recovery
- Backup Your Website: Before making significant changes, always back up your website, including the theme files and database, to easily recover in case of issues.
- Version Control: If you’re editing theme files directly, consider using version control systems like Git to track changes and roll back if necessary.
J. Seek Professional Help
- Consult Experts: If you encounter persistent issues that you can’t resolve, consider seeking assistance from a professional WordPress developer or support community.
Troubleshooting issues during link color customization is essential to creating and maintaining a functional and visually appealing website. By promptly addressing any identified problems, you can ensure your WordPress website continues to offer optimal user experiences.
Additional Resources:
- How to Convert From Container to Column WordPress
- Link: How to Convert From Container to Column WordPress
- Description: Discover how to transform the layout of your WordPress website by converting containers to columns. This comprehensive guide will walk you through the process, helping you achieve a more dynamic and visually appealing design.
- Can ChatGPT Create a Website?
- Link: Can ChatGPT Create a Website?
- Description: Explore the possibilities of AI-powered web development. This article delves into the potential of ChatGPT in creating websites. Learn about the capabilities, limitations, and innovative applications of AI in the world of web design and development.
- How to Uninstall WordPress from cPanel – A Step-by-Step Guide
- Link: How to Uninstall WordPress from cPanel – A Step-by-Step Guide
- Description: Sometimes, you may need to remove WordPress from your hosting environment. This step-by-step guide provides clear instructions on how to uninstall WordPress using cPanel, ensuring you can efficiently manage your web hosting and server resources.
These articles are related and they offer insightful guidance on various aspects of WordPress, web development, and AI in web design. They can be a great resource for anyone looking to customize their WordPress website, explore AI’s role in website creation or need assistance with managing their WordPress installation. If you are on a journey in web development and design, these resources can be an excellent reference for you.
Conclusion
As part of this comprehensive guide for how to change link color in wordpress, we’ve explored the nuances of changing link colors in WordPress – an often neglected yet critical aspect of web design. Link colors not only guide visitors around your site but can also play an essential part in branding and accessibility

